
一个简单的LangGraph和dify智能体融合的方案
·
为什么要融合
- 在LangGraph中也可以自己搭建各种智能体,但是需要使用组件库以及代码的编写来实现复杂的智能体方案以及图结构的设计
- dify提供的方案可以实现低代码或无代码搭建智能体,适合初学和没有代码基础的个人使用
- 所以两者结合起来可以让有一定代码基础的个人或团队搭建出一套复杂且适配业务场景的多智能体框架
dify智能体搭建
可以参考其他文章的搭建过程以及方案
本文主要讲解如何使用LangGraph将智能体串联起来实现多智能体(Multi-Agent)协作
LangGraph结构
- 状态(State):是贯穿工作流的核心数据结构,用于存储和传递上下文信息。每个节点执行后,会通过返回新值覆盖或追加到状态中。
- 节点(Nodes):用来执行特定的操作或逻辑,比如数据处理、调用外部服务、调用 LLM、访问数据库等。节点接受一个 State 作为输入,经过内部计算后,返回更新后的 State。
- 边(Edges):基于当前 State,决定下一步执行哪个或哪些节点。包括起始边、正常边和条件边。
- 下面是本次介绍使用的由五个智能体串起来的一个结构图谱

1.图中一个方框就代表一个dify智能体(此处也可以是使用LangChain搭建的智能体)
2.虚线表示条件边
3.实线表示普通边
4.start和end就是字面的开始和结束点
dify智能体API调用
import os
from typing import TypedDict, Optional, Generator
import requests
from langgraph.graph import StateGraph, END, state
import json

def _handle_dify_stream(response: requests.Response) -> Generator[str, None, str]:
    """处理Dify流式响应"""
    buffer = ""
    try:
        for chunk in response.iter_lines():
            if not chunk:
                continue

            decoded_chunk = chunk.decode('utf-8').strip()
            if not decoded_chunk.startswith('data:'):
                continue

            data = json.loads(decoded_chunk[5:])
            if 'answer' in data:
                buffer += data['answer']
                yield data['answer']
            elif 'error' in data:
                raise RuntimeError(f"Dify API Error: {data['error']}")

    except (requests.exceptions.ChunkedEncodingError, json.JSONDecodeError) as e:
        raise RuntimeError(f"响应解析失败: {str(e)}") from e

    return buffer
import os
from typing import TypedDict, Optional, Generator
import requests
from langgraph.graph import StateGraph, END, state
import json

def call_weatherModule_agent(state: AgentState) -> AgentState:
    """调用Dify平台智能体,返回更新后的状态"""
    headers = {
        "Authorization": f"Bearer 此处是API-KEY",
        "appCode": "此处填写agent名称"
    }

    payload = {
        "query": state["user_input"],
        "response_mode": "streaming",
        "user": "abc_123",
        "inputs": {},
        "files": [],
        "auto_generate_name": "true",
        "conversation_id": ""
    }

    updated_state = state.copy()
    try:
        # 发起流式请求
        response = requests.post(
            DIFY_CONFIG["endpoint"],
            headers=headers,
            json=payload,
            stream=True,
            timeout=100
        )
        response.raise_for_status()

        # 处理流式响应
        full_response = []
        stream_handler = _handle_dify_stream(response)

        # 实时处理片段(可根据需要在此处添加实时处理逻辑)
        for chunk in stream_handler:
            full_response.append(chunk)

        # 获取最终完整响应
        try:
            while True:
                next_chunk = next(stream_handler)
                full_response.append(next_chunk)
        except StopIteration as e:
            complete_response = e.value  # 最终完整响应

        updated_state["agent_response"] = "".join(full_response)
        updated_state["error_message"] = None

    except Exception as e:
        updated_state["error_message"] = f"{type(e).__name__}: {str(e)}"
        updated_state["agent_response"] = ""

    return updated_state
其余智能体同理,_handle_dify_stream方法可共用
串连智能体
import os
from typing import TypedDict, Optional, Generator
import requests
from langgraph.graph import StateGraph, END, state
import json

def create_workflow() -> StateGraph:
    workflow = StateGraph(AgentState)

    # 添加智能体节点
    workflow.add_node("domain_agent", call_domain_agent)  # 一级
    workflow.add_node("ITModule_agent", call_ITModule_agent)  # 二级
    workflow.add_node("PAModule_agent", call_PAModule_agent)  # 二级
    workflow.add_node("week_module_agent", call_weekModule_agent)  # 三级
    workflow.add_node("weather_module_agent", call_weatherModule_agent)  # 三级

    # 设置入口点
    workflow.set_entry_point("domain_agent")

    # 条件判断逻辑
    def routing_condition(state: AgentState) -> str:
        """根据 domain_agent 的响应返回路由标记"""
        response = state.get("agent_response", "").lower()
        if "it" in response:
            return "IT"
        if "pa" in response:
            return "PA"
        return "other"

    # 添加条件分支
    workflow.add_conditional_edges(
        source="domain_agent",  # 起始节点
        path=routing_condition,  # 条件函数
        path_map={
            "IT": "ITModule_agent",  # 条件返回 "IT" 时跳转
            "PA": "PAModule_agent",  # PA跳转
            "other": "weather_module_agent"  # 测试
        }
    )

    def routing_condition_IT(state: AgentState) -> str:
        """根据 ITModule_agent 的响应返回路由标记"""
        response = state.get("agent_response", "").lower()
        if "week" in response:
            return "weekOrMonth"
        else:
            return "other"

    # 添加条件分支
    workflow.add_conditional_edges(
        source="ITModule_agent",  # 起始节点
        path=routing_condition_IT,  # 条件函数
        path_map={
            "weekOrMonth": "week_module_agent",
            "other": END
        }
    )

    def routing_condition_PA(state: AgentState) -> str:
        """根据 ITModule_agent 的响应返回路由标记"""
        response = state.get("agent_response", "").lower()
        if "weather" in response:
            return "weather"
        else:
            return "other"

    # 添加条件分支
    workflow.add_conditional_edges(
        source="PAModule_agent",  # 起始节点
        path=routing_condition_PA,  # 条件函数
        path_map={
            "weather": "weather_module_agent",
            "other": END
        }
    )

    # 连接week_module_agent到END
    workflow.add_edge("week_module_agent", END)
    # 连接weather_module_agent到END
    workflow.add_edge("weather_module_agent", END)

    return workflow.compile()
代码使用了常用的方法,节点add_node(),普通边add_edge(),条件边add_conditional_edges(),这段代码就是组成了上面的结构图谱
调用展示
if __name__ == "__main__":
    workflow = create_workflow()  # 创建对话工作流
    print("对话已启动,输入内容开始聊天(输入 退出 或 exit 结束)")

    # 持续对话循环
    while True:
        try:
            # 获取用户输入
            user_input = input("\n用户:").strip()
            if user_input.lower() in ["退出", "exit"]:
                print("对话结束")
                break

            # 构造初始状态
            init_state = AgentState(
                user_input=user_input,
                agent_response="",
                error_message=None
            )

            # 执行工作流
            result = workflow.invoke(init_state)

            # 处理响应
            if result["error_message"]:
                print(f"\n错误:{result['error_message']}")
            else:
                print(f"\n助手:{result['agent_response']}")

        except KeyboardInterrupt:
            print("\n对话被用户中断")
            break
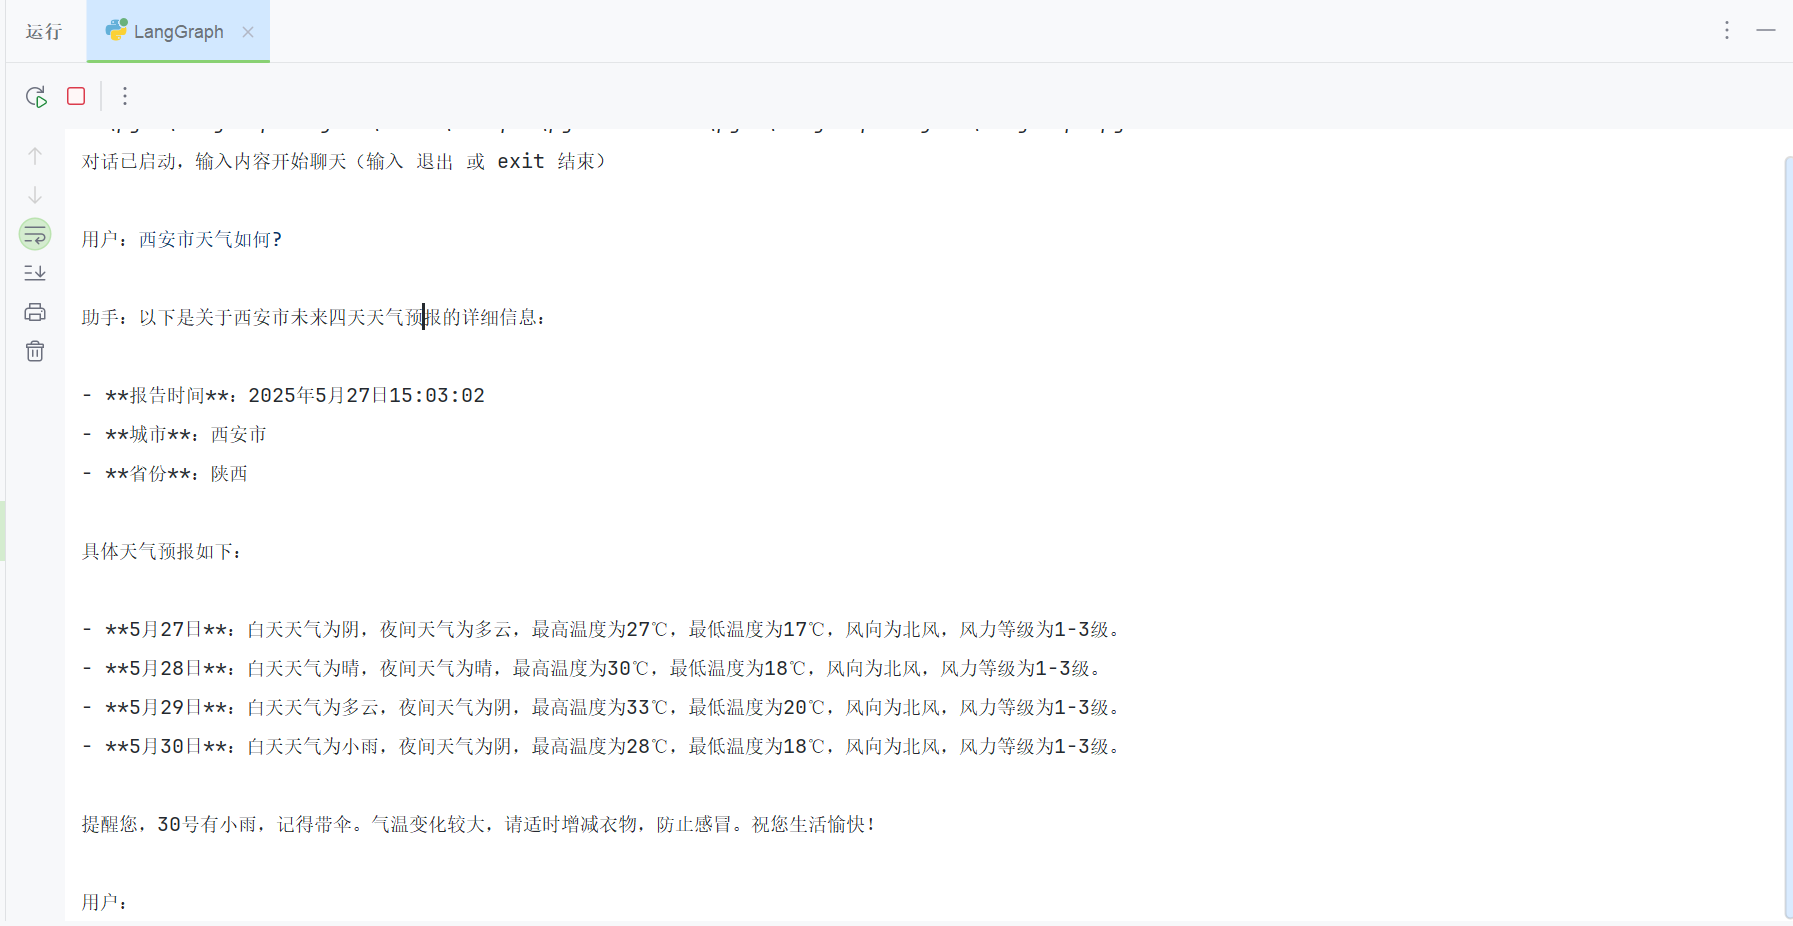
效果
更多推荐


 7
7 0
0- 0


 已为社区贡献1条内容

所有评论(0)